How to Take Before & After Photos: A Comprehensive Guide for Painting Contractors
Introduction
As a painting contractor, showcasing your work is essential to attracting new clients and maintaining a professional image. One of the most effective ways to demonstrate the quality and impact of your services is through before-and-after photos. These photos not only highlight the dramatic transformations you create but also serve as powerful marketing tools. In this comprehensive guide, we will cover everything you need to know about taking compelling before-and-after photos, from preparation to editing and using them effectively in your marketing strategy.
Why Before & After Photos are Crucial for Painting Contractors
- Visual Proof of Quality
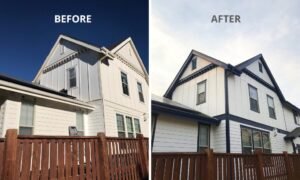
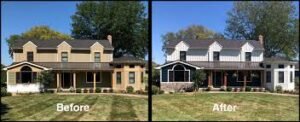
Before-and-after photos provide clear, visual evidence of your expertise and the quality of your work. They allow potential clients to see the difference you can make, building trust and credibility.
- Powerful Marketing Tool
High-quality before-and-after photos can be utilized across various marketing platforms, including your website, social media, and print materials. They help to create a strong online presence and engage potential customers.
- Showcases Professionalism
Presenting professional before-and-after photos demonstrates your commitment to quality and attention to detail, enhancing your reputation and setting you apart from competitors.
Preparing for the Photoshoot
- Gather the Necessary Equipment
To capture high-quality photos, you’ll need the right equipment. Essential items include:
- Camera: A digital camera or a high-resolution smartphone camera.
- Tripod: Ensures steady shots and consistent angles.
- Lighting: Portable lights or reflectors for proper illumination, especially for indoor projects.
- Tape Measure: To ensure you replicate the same distance and angle for before and after shots.
- Clean and Organize the Space
Ensure the area to be photographed is clean and free of clutter. Remove any unnecessary items that could distract from the focal point, which is the painting work.
- Plan Your Shots
Identify the key areas you want to highlight. Plan your shots in advance to ensure you capture the most impactful angles and details. Consider taking wide-angle shots to show the entire space and close-up shots to highlight specific details.
Taking the Before Photos
- Use Consistent Angles and Positions
Set up your camera on a tripod and take note of the exact position and angle. Consistency is crucial for creating a clear comparison between the before-and-after shots. Use a tape measure if necessary to ensure accuracy.
- Optimize Lighting
Good lighting is essential for clear, professional-looking photos. For indoor shots, use additional lighting to eliminate shadows and ensure the area is well-lit. Natural light is ideal, so try to take photos during the day when possible.
- Capture Detailed Shots
Take close-up shots of areas with significant imperfections or damage. These detailed shots can highlight the transformation more effectively when compared to the after photos.
Documenting the Painting Process

- Capture Progress Photos
Consider taking photos at different stages of the painting process. These progress shots can be used in your marketing materials to show the steps involved and the attention to detail in your work.
- Maintain Consistency
Keep the camera settings, angles, and lighting consistent throughout the process. This will make the before-and-after comparison more impactful.
Taking the After Photos
- Replicate the Before Shots
Return to the exact spot where you took the before photos. Using the same angles, positions, and lighting conditions will provide a direct and clear comparison.
- Highlight the Finished Work
Focus on the areas that show the most significant improvement. Ensure these areas are well-lit and clearly visible in the photos.
- Include Contextual Elements
Include some context in your after photos, such as furniture or fixtures, to give a sense of the space and the impact of your work.
Editing Your Photos
- Basic Adjustments
Use photo editing software to make basic adjustments, such as brightness, contrast, and sharpness. Be careful not to over-edit, as this can make the photos look unrealistic and diminish the authenticity of your work.
- Consistent Editing Style
Maintain a consistent editing style across all your photos. This consistency helps create a professional and cohesive look for your portfolio.
- Label Your Photos
Clearly label your before-and-after photos to make it easy for viewers to understand the transformation. Use simple labels like “Before” and “After” or more descriptive ones if necessary.
Using Your Photos in Marketing
- Website and Portfolio
Create a dedicated section on your website for before-and-after photos. This allows potential clients to easily see the quality of your work and the transformations you can achieve.
- Social Media
Share your before-and-after photos on social media platforms such as Instagram, Facebook, and Pinterest. Use relevant hashtags and engaging captions to reach a wider audience and attract potential clients.
- Email Marketing
Incorporate before-and-after photos in your email marketing campaigns. They can be used to showcase recent projects, highlight special offers, or share customer testimonials.
- Print Materials
Use your photos in brochures, flyers, and other print materials. High-quality before-and-after photos can make your marketing materials more visually appealing and effective.
SEO Optimization for Your Photos

- Use Descriptive File Names
Rename your photo files with descriptive, keyword-rich names before uploading them to your website. Instead of “IMG_1234.jpg,” use “living-room-before.jpg” and “living-room-after.jpg.”
- Add Alt Text
Add descriptive alt text to your photos. Alt text helps search engines understand the content of your images, which can improve your website’s SEO. For example, use “before photo of living room with damaged walls” and “after photo of living room with freshly painted walls.”
- Optimize Image Size
Ensure your photos are optimized for web use. Large image files can slow down your website, negatively impacting user experience and SEO. Use image compression tools to reduce file size without sacrificing quality.
- Create Engaging Captions
Write engaging captions for your photos that include relevant keywords. Captions can provide additional context and improve SEO by making your content more accessible to search engines.
Best Practices for Taking Before & After Photos
- Consistency is Key
Consistency in angles, lighting, and composition is crucial for creating effective before-and-after comparisons. Use a tripod and take detailed notes or measurements to ensure you replicate the same setup for the after photos.
- Focus on Lighting
Good lighting can make a significant difference in the quality of your photos. Use natural light whenever possible, and supplement with additional lighting if needed to eliminate shadows and highlight details.
- Pay Attention to Detail
Detail shots can be particularly effective in showcasing specific improvements. Take close-up photos of areas that have undergone significant changes to highlight the quality of your work.
- Use High-Quality Equipment
Invest in a good quality camera and tripod. While smartphone cameras have improved significantly, a digital camera can provide higher resolution and better control over settings.
- Edit with Care
Use photo editing software to enhance your photos, but avoid over-editing. Adjust brightness, contrast, and sharpness to ensure your photos look professional and realistic.
Conclusion
Taking high-quality before-and-after photos is essential for painting contractors. These images are powerful marketing tools that showcase your expertise, build trust with potential clients, and enhance your professional reputation. At Elite Painter Marketing, we guide you through capturing compelling before-and-after photos that highlight the transformative impact of your work. By maintaining consistency, optimizing lighting, focusing on details, and strategically using these photos in your marketing efforts, you can significantly boost your business and attract more clients.